Add Additional Realism with Objects
AGi32 has a library of low-poly (simple) objects for you to use. We can access a few of these for our model. We can also build our own (or import them) and add them to our own branches of the library.
- Return to Model Mode.
- Access the viewpoint Secretary and Executive.
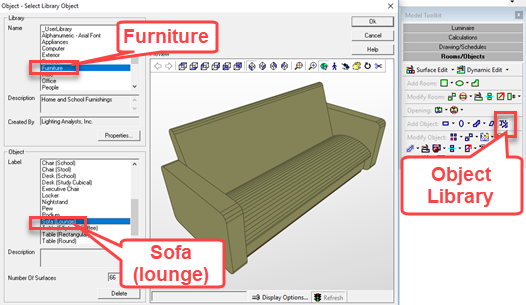
- From the Rooms/Objects Toolkit select the Object Library command (shown below).
- In the dialog, select the Furniture library.
- Locate and select the Sofa (lounge) object from the lower portion of the dialog as shown.

- Click OK to advance. In the subsequent dialog you have the opportunity to change color/reflectance and resize the object before dropping in your model. Changing the size is done directly in the dialog, surface properties such as color are accomplished using Surface Edit (access button in the dialog).

- Click OK to place the sofa object. It is attached to the cursor.
- Locate the corner of the object as shown below to make it easy to align.
- Right-click to terminate the operation (we have placed one sofa instance).

- Select the Object Rotate command (Rooms/Objects Toolkit) to rotate the sofa into position.
- Select the sofa (click), right-click to accept the selection. (watch the command line for step by step instructions).
- Select a point to rotate from (use the same point used to place the sofa).
- Move the mouse to rotate into position. Keep the cursor close to the rotate point to make it easy to hit the 90-degree alignment.
- Click to drop.

Utilize the same two commands to place a desk and rotate it into position.
- Open the Object Library again.
- Select the Office library.
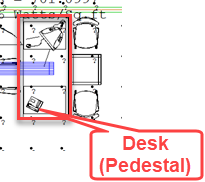
- Locate the object titled Desk (Pedestal).
- Click OK to advance.
- In the second dialog scale the X dimension up by 20% (enter 1.2).
- Drop it in place as shown below in the Executive space (upper left corner of desk shown in the CAD background).
- Right-click to end the place operation.
- Use the Object – Rotate command to rotate the desk into position.


